
Cellular Setup Guide
Instructions for most 2014 and older cellular trail cameras.
Sim Card Instructions for purchasing through a Cellular Retail Store:
Getting the correct sim card is crucial. You MUST get the AT&T Go Phone Plan (without the phone), 10¢ per minute plan, this is a month to month plan, no contract required. Activate the plan when the camera is out, deactivate it when you aren't using it. Add unlimited text messages to this plan. This should cost $19.99 per month. If for whatever reason some AT&T salesperson tries to tell you you have to add minutes or anything else. DON'T DO IT. It will not work with any other plan (other than the one described earlier). Have them put the sim card in a cell phone and send you a text message with a picture attached. This ensures the sim card is connected to the network.
If they ask you for the IMEI number, they aren't getting you the right plan.
If you are already an AT&T customer, just add a line with unlimited text messages. You do not need minutes or data. This should cost $9.99 a month.
Step-by-Step Instructions
Insert sim and SD card in camera. Move switch to setup on camera and press the menu key and set the camera to the following settings. Press OK after each change.
| Cam |
|
| Camera Mode |
Photo |
| Photo Size |
3, 5 or 8MP |
| Photo Burst |
1 Photo |
| PIR |
|
| Sensitivity |
Normal or High |
| Trigger Interval |
1 Min or More |
| Time - Lapse |
Off |
| Start-Stop |
Off |
| GSM |
|
| Send Mode |
Instant |
| Send Via |
MMS |
| Send to |
Phone, Email or Both |
| SYS |
Set Clock |
| Time Stamp |
On |
| Flash Range |
12m/40ft |
| Password |
Off |
| Beep |
Off or On |
| Over Write |
Off |
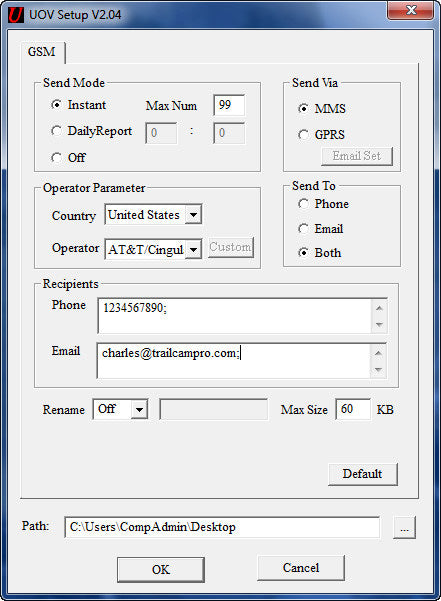
- Next on the menu go to the GSM column and arrow down to Download Tool and then press OK.
- Then turn camera off and remove SD card.
- Place the SD card in the SD reader on your computer.
- Open the SD card and you will see two folders.
- A DCIM and a GSMSETUP folder.
- Double click on the GSMSETUP to open this folder.
- Copy the UOV Setup file to your desktop.
- Run the UOV Setup program on your desktop and make the necessary changes.
- Multiple phone numbers or emails should be separated by a semicolon.
- Then select OK and the profile will be copied to your desktop.
- Now delete the GSMSETUP folder from your SD card.
- Then copy the created profile on the desktop to the SD card.
- Place it outside of the DCIM folder.
- Now insert the SD card in the camera and move the switch to Setup and watch the LCD screen.
- You should see a message appear that says Update Success.
- You can go to GSM on the Menu and arrrow down to Recipients and press OK to see if correct info was installed.
- Your camera is now ready to function and send messages.
- You now can setup another SD card by copying this profile to a blank SD card.
- You only need to run the UOV Setup program if you want to make changes to your profile.
Shop Cellular Trail Cameras


Security Trail Cameras


Batteries For Trail Cameras


Submit Withdrawal Request
Please fill out the following form to submit your withdrawal request.