
Finding Bucks Using Trail Cameras
By Rich Howell
Senior Editor Trailcampro
QDMA Contributing Author & Life Member
So you’ve acquired your first trail camera and now you’re determined to find the biggest buck on trail cameras in the area. Seems pretty simple. Find a nice tree, hang a camera and dump a pile of corn…. Right? Well, you could do this and fairly quickly you’d have plenty of pictures to review. However, you probably won’t get a picture of a monster buck (at least not consistently) and reviewing these photos most definitely will not be the best use of your time or resources.
Why bait sites are poor scouting tools
Corn is expensive
Like the title suggests corn is expensive and just as important, it doesn’t last very long. Dump an entire bag then come back in just a few days. More than likely it will be gone. In addition to the expense, this will also require frequent visits to the location. Those visits are time consuming and also deposit human scent thereby deterring any decent buck from visiting.
Non-Target Species
Deer love corn - So do raccoons, squirrels, crows and dozens of other animals including bears. If you plan on using corn to attract deer, you should also plan on feeding most of the other wildlife in the area as well. You’ll get photos of deer. In fact, you’ll probably get thousands every week, but you’ll also get thousands of unwanted photos as well.
Bait sites become ambush sites
As soon as deer become accustomed to frequenting bait sites, predators won’t be far behind. For humans, hunting over bait is one of the easiest methods (albeit unethical & illegal in most places) why should it be any different for a mountain lion or coyote? Because of this, older and smarter deer will avoid these sites thereby defeating the purpose of the site in the first place.
Inefficiency
Photography enthusiasts say “You must take a thousand photos just to get one good photo.” I’ll admit, early on I spent countless hours clicking through thousands upon thousands of trail cam photos in hopes of finding just one acceptable photo. It is mind numbing and the worst use of time I have ever spent. Trail cameras positioned over bait capture hundreds of redundant photos of the same animal. Yes, it is possible to program any modern trail camera with a delay between triggered photos, but what do you risk missing? Do you want a doe (or worse, a raccoon) to trigger your camera and then have a monster buck visit your site while the camera is timed out on delay?
Collectively, modern Trail cameras have an almost unlimited selection of programming options, but no single camera has all options. At Trailcampro we exclusively test trail cameras and trail cameras only. This is what makes us different from any & all other places you could buy a camera. If you’re considering the use of a trail camera in your scouting efforts, PLEASE contact us via phone, email or chat. We’d be happy to help you match the perfect scouting camera with your specific needs.
If You Must….
If you insist on using some type of attractant to lure deer for a photo session, I recommend the following tips:
Use a Trophy Rock or similar mineral
As mentioned earlier, corn is expensive and doesn’t last very long. In addition, it also attracts and is consumed by numerous non-target species. Deer love mineral products like trophy rocks and are drawn to them on a regular basis. Unlike corn, mineral products typically aren’t consumed by other animals and usually last months. One reason I like to use a Trophy Rock is because it is literally a big chunk of mineral mined from the ground. Most other mineral products come in powdered or granular form. While they are still vastly better than corn, they don’t last nearly as long as a Trophy Rock. Using either, you’ll find deer will still frequent the site long after the product is gone to eat surrounding dirt which absorbed the minerals. Finally, these products provide trace minerals beneficial to the deer’s overall health and most importantly, antler growth.
Don’t place your camera directly over the mineral
For efficiency’s sake, you’ll save yourself countless hours if you place your camera on a game trail leading to or from your mineral site, but not directly over the site. Optimally, I would suggest placement about 10 – 20 yards away from the mineral. In this scenario, you’ll capture photos of nearly every animal visiting the mineral, but not hundreds of each. Although deer don’t stay at mineral sites nearly as long as corn-stocked bait stations, they do stop and their behavior does become predictable. Mineral sites are less likely to become ambush sites, but older bucks will still tend to keep their distance. By placing your cameras 10 – 20 yards away you’ll increase your chance of capturing photos of wary bucks who decided to stay back from the rest of the group while they consumed minerals. Additionally, once the mineral site is well established, I would look for lesser used trails which parallel the main trails leading to your mineral sites. Oftentimes elusive bucks who want to keep tabs on does will follow them, but usually stay off to one side in a potentially safer area. My ranch has a network of roads which cover most of the property. Many of these roads intersect well-used deer trails. Again, for efficiency’s sake, I place most of my mineral stations on trails near road intersections for easy access.
Food - Water - Cover
If you decide against a bait or mineral station, your scouting efforts should almost be exclusively focused on the three resources above and the travel corridors which connect them. Hopefully, you have some type of Ag crops or food plots located directly on your property. If not, establishing a food plot is most likely the single best thing you could do to improve the habitat on your property. If you are lucky enough to have a planted food source on your property, keep reading. If not, please skip down to “Scouting terrain features with maps”.
Scouting Ag Fields & Food Plots
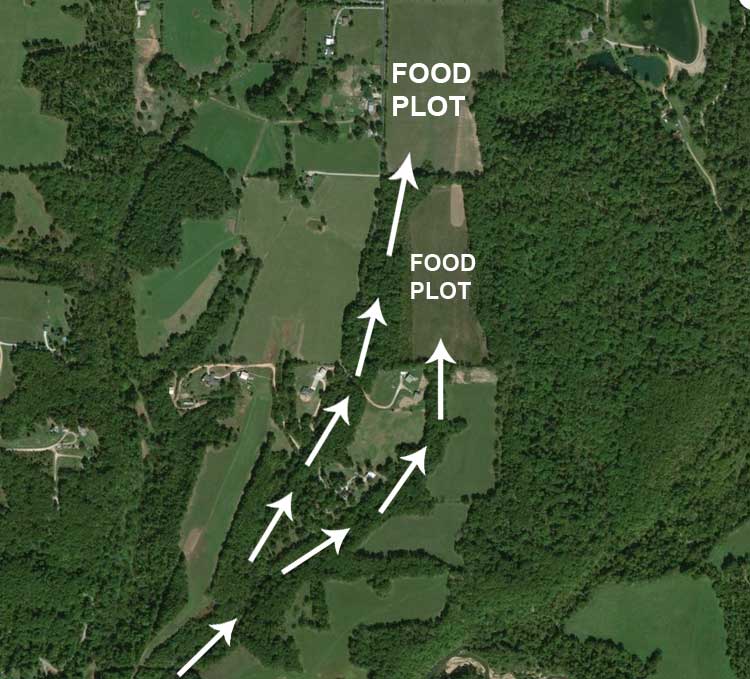
So you’ve found a property with an established food plot/agricultural field. Now all you have to do is hang some stands around the perimeter and wait for the deer? Well, maybe. Unless you are very lucky, you’ll probably only see does and young bucks during daylight hours. And if that’s what you’re after, then it can be just that easy. However, most mature deer avoid vulnerable, open spaces until after dark. If you’re after a monster (old & wise) buck, you’ll have to use a little more advanced strategy. It’s nearly impossible to sneak up on a bedded deer. The bedding areas they most often choose put terrain features and prevailing winds in their favor. We also know most big bucks are reluctant to enter large food plots until after dark. With this in mind, your highest probability chance of catching a big buck on trail cameras during daylight will be intercepting him on his way from a bedding area to a food source.
Where to start – Time-lapse Photography
Unless you’re intimately familiar with the travel behavior of deer in your area, using a time-lapse camera is a great place to start. Time-lapse cameras take photos at pre-determined intervals regardless of whether motion is detected. When I’m scouting a new area I’ll hang a time-lapse camera overlooking an entire food plot/field and program it to take photos every minute during prime feeding hours. I always point the camera north to avoid capturing photos pointing directly into the sun. Deer are creatures of habit and after a short time, you should be able to identify the general areas deer use to enter & exit fields. At this point, I will move the camera(s) closer to the perceived entry/exit areas and adjust camera programming to capture both time-lapse and motion activated photos at the same time. I use this type of programming because I know the general area, but not the exact point at which deer are entering/exiting. If a deer crosses in front of the trail camera in between the 1-minute intervals, I want the motion to trigger a photo which would otherwise not be captured. If deer enter the field outside the range of the camera’s motion sensor, I still want a photo every minute to pick up any activity the motion sensor misses. Hopefully, this stage will identify the exact area where the funnel leads into the field. If not, I adjust until the exact funnel is identified.
Finding a trail camera which does exactly what you want can be a bit of a chore. The dual mode time-lapse/motion camera mentioned above is a great example. There’s a ton of information on the web. Unfortunately, most of it is simply copy and pasted from the same low-tech source. User manuals are available on websites, but most are translated from Chinese to English and weren’t very good before the translation. You can spend countless hours researching online, or you can just call us and let one of our trained experts tell you exactly what you need. If needed, they can also provide training on how to use it. Are you techno-phobic? Tell us exactly what you want and we’ll program your camera before we ship it. Place your new camera in the field and use it for up to a full 90 days. If it doesn’t do what you want or you’re not satisfied in any way at all, we’ll take it back – No Questions Asked.
Narrow Your Search
After you've identified the major entry funnels, your job now is to work backwards toward daytime bedding areas. More than likely your main entry funnel will be a well-used trail which quickly splits into multiple trails once it makes its way into the timber. It’s this first intersection where you’ll want to place your next camera. Closely examine the area. Do you find droppings, nibbled off plants or leaves? What about rubs? Could this be a staging area? As the main trail divides, do any of the secondary trails stand out? Walk each trail and look for any identifying factors which may indicate one trail is used more often by bucks. Don’t rule out perceived low traffic trails, especially if they parallel high traffic trails. These lesser trails are often used by bucks. Look for sign on these trails. Do you see any rubs or scrapes? Rubs are often found on the side of the tree from which the buck is coming which will be the opposite side of the tree you are viewing. Take your time and be very thorough. When you mount your first camera at the intersection make sure it covers activity from all trails, but aim it specifically to favor activity coming from the trail most likely to be used by bucks. The ideal distance for a trail camera photo is somewhere between 10’ -20’. You want to be close enough to make out details and have good flash illumination, but not so close you risk spooking deer. Additionally, photos closer than 10’ also run the risk of overexposure (whiteout) with the inability to identify any detail at all.
 |
 |
Each year at Trailcampro we test and review every new trail camera on the market. In addition to test results, we also post photos taken by all new cameras at all times of the day and night. In particular, we set up a flash range test where all new trail cameras are triggered from the exact same position, on the same night and under the same atmospheric conditions. Viewing photos from this test is a great way to determine whether a particular model is suitable for your specific scouting situation. No matter which model you choose, your purchase from Trailcampro is 100% guaranteed. Mount your new camera at your scouting location and use it for up to a full 90 days. If for any reason at all it doesn’t perform as expected, we encourage you to return it for a full refund or exchange it for a model which better suits your needs – no questions asked.
I very rarely recommend hanging a trail camera above eye level, but this scenario could be an exception. Typically, mounting a camera high and aiming it downward greatly reduces its detection area. However, in this case, you’re not covering a large area. Mounting the camera high will most likely place it out of a deer’s line of sight making it less of a threat if noticed at all. Incidentally, I would suggest using a no-glow, completely invisible camera in this circumstance. You’ll also want an unobstructed path from the camera to the photo area which is why you’ll want to carry a folding hand saw. If you have a second camera (and you should), walk down the presumed buck trail and place it in similar fashion at the next intersection. As you leapfrog from intersection to intersection you’ll no doubt run into some dead ends with no promising sign at all. However, at some point, you’ll follow a trail into thick cover or a South facing slope where you’ll spook deer out of their daytime beds. Congratulations! Turn around and don’t go back. Retrace your path back to the field and pick the best tree along the way. Make sure your tree is on the downwind side of the trail and carefully consider all aspects of your entry & exit strategy. You might find the best tree in the county, but if you can’t access it without spooking and educating deer, it’s worthless.
Choose Wisely & Good Luck!
Scouting terrain features with maps
Many of us don’t have the luxury of hunting properties with large Ag fields or game specific food plots. With no obvious food source, the next best strategy is to thoroughly scout the area surrounding your hunting spot using topographical maps and satellite imagery. There are numerous options, but Google Maps is definitely one you’ll want to consider. It’s free and you can toggle between terrain maps & satellite imagery. You also have the option of transforming the satellite images into three-dimensional shots which can be viewed from any aspect. Best of all, any of the features you mark on your desktop machine will also show up on your mobile device when you’re in the field (if you have a Google account).
Focus your search
Most mature bucks use a relatively small core area often contained within a ½ mile radius. For many bucks, this shrinks even more as they age. With this in mind, I suggest thoroughly examining all adjoining property within ½ mile of your boundaries. You’ll be looking for bedding areas, food/water sources and any potential travel corridors which connect these areas. Deer prefer thick cover and South facing slopes for daytime bedding areas. Cedar stands are favorites and easily identified on satellite images captured during the winter months. Large stands of open timber may be tempting but are widely considered to be nutritional deserts for deer. The canopies of mature hardwoods prevent growth of most edible understory species and the lack of cover puts deer at risk anytime they enter. The only exception would be stands of mature, acorn-producing oaks. When acorns are dropping there are few areas which are more productive. Otherwise, I would avoid open timber in your initial scouting.
Like humans, deer will usually follow the path of least resistance. However, where humans don’t mind walking out in the open, deer avoid it at all costs. If a bedding area is point “A” and a food source is point “B”, deer want to get from point A to point B with the least risk possible. Look for any areas which offer cover or concealment in route from point A to point B. Wooded draws and creek beds are great examples – especially when positioned between open fields or agriculture. Deer can travel hidden in the cover of a wooded corridor or out of sight while following a trail through a ravine or next to a creek. Look for these corridors connecting known food sources and perceived bedding areas. Once identified, it’s time to put boots on the ground.
Physical Scouting
Go to the places you’ve selected using maps. Imagine you’re a deer and walk each perceived travel corridor. As mentioned before, deer are like humans and are drawn to the path of least resistance. When I’m walking in the woods I’m inevitably funneled onto a deer trail because it’s usually the easiest path. I think most people will experience the same result. The only deviation I notice is deer walk about two (2) feet shorter than most humans and we walk around many obstacles deer simply walk underneath. While walking these trails look for the same type of sign mentioned earlier. Is there any evidence which suggests this trail might be used by bucks? In addition to droppings and tracks, can you find any rubs or scrapes? Remember, rubs are usually found on the side of the tree facing the buck as he travels from a bedding area to a food source. If you do find rubs, are they on saplings or trees 3” or larger? As you travel from known food sources to potential bedding areas, well-used trails will often split into multiple trails. These intersections are great places to position trail cameras for scouting. Carefully examine each trail to see if one might be used more by bucks. Set a camera covering as many trails as possible, but favoring the trail you feel is most likely used by bucks. Collect data and move up and down each corridor until you bump deer or find substantial deer sign. Now it’s time to find your potential ambush site.
Put the odds in your favor
Although the wind fluctuates day to day, most areas exhibit predominant wind patterns. Once you identify a travel corridor, immediately eliminate the upwind side of the trail for potential stand locations. You must also thoroughly investigate ingress/egress strategies. A killer stand location is worthless if you can’t access it without spooking every deer in the area. There are some exceptions though. Every once in a while I’ll come across a setup which is absolutely perfect in every way except the prevailing wind direction. With a little-advanced planning, these locations may offer the most successful hunting of the season. Cold fronts produce some of the best activity & deer movement I’ve witnessed. Where I hunt, most cold fronts are brought in by a Northerly wind which is the exact opposite of the predominant South/Southwest wind we normally hunt. Northerly winds are abnormal for our area and this in itself could make a stand setup even better. Many great stand locations become mediocre through overuse. Knowing a stand is only huntable a few days of the season should increase your self-control and help you limit the number of trips there.
Confirm your assumptions
Once you find your dream stand location(s), I recommend you confirm your choice(s) by monitoring activity via the use of a trail camera. This is a delicate issue. You want to assess the area, but you don’t want to impact deer movement by visiting the site too often – especially as your season approaches.
If it fits within your budget and you have decent cell signal, I always recommend using a cellular trail camera in this situation. Once set up, you can remotely monitor your stand area without visiting on a regular basis. In some cases, you may not have to physically visit at all. Solar powered cellular trail cameras have the capability to run indefinitely without the need to ever return.
Consider The Total Value
Expert Advice
At Trailcampro we have a staff of trained experts who work exclusively on trail cameras and trail cameras only! We’re available M-F, 9-5 EST to answer any questions you might have, provide consultation or help program your camera over the phone. We’re extremely confident in the accuracy of our reviews. So much so, we back up purchases on our website with our 90-day, no questions asked guarantee.
No Risk Guarantee
Purchase a game camera from Trailcampro, place it in the woods and use it as you normally would for up to a full 90 days. If for any reason at all you are not completely satisfied, return your camera for a full refund, No Questions Asked!
Exclusive 2-Year Warranty
Additionally, cameras purchased at Trailcampro also come with our exclusive 2-year warranty. No matter the length or terms of the original manufacturer’s warranty, Trailcampro warrants cameras sold through our website for a full two (2) years. There’s no need to fill out a registration card and we handle everything in-house. Simply send your defective unit to us and we’ll ship you a replacement, usually the same day!
Consider everything above & I think you’ll find shopping at Trailcampro is a smart choice!
Shop Cellular Trail Cameras


Security Trail Cameras


Batteries For Trail Cameras


Submit Withdrawal Request
Please fill out the following form to submit your withdrawal request.